Deploy static IIS site using Jenkins and Octopus
How to deploy static IIS site using Jenkins and Octopus
This post will cover how to create a nuget package for a project that needs deploying on different environments as an IIS Site holding static assets. However there is no difference between any other project that needs similar deployments except the octopus setup. We will be using Jenkins as builder and Octopus for deployment.
Use case
My use for this was for a Static IIS Site solution that needed often deployments. Main reason was to get rid of manual deployment and going to 1 click deployments.
Ideas for building on top of this: acceptance tests, blue-green deployment, logging.
Assumptions & setup
- using git
- have a project you want to deploy on multiple environments
- have jenkins setup
- have octopus setup
- nuget feed in this tutorial: octopus integrated library.
Let’s do it manually first
We’re going to need NuGet packager to generate packages:
- Download Nuget exe
- we’re going to integrate it in our solution so we don’t depend on things installed on server
- drop the exe in
pathTo/myProject/tools - commit it into your git solution
Create NuSpec file
- in the project root, create
.nuspecfile - use the following template to include everything in the solution
- as it stands, it generates a nuget package that contains everything in the folder
- NuSpec documentation reference for customisation, excluding files etc.
<?xml version="1.0" encoding="utf-8"?>
<package xmlns="http://schemas.microsoft.com/packaging/2011/08/nuspec.xsd">
    <metadata>
        <id>SolutionId</id>
        <version>1.0.0.0</version>
        <title>SolutionTitle</title>
        <authors>SolutionAuthors</authors>
        <owners>SolutionOwners</owners>
        <description>SolutionDescription</description>
        <language>en-US</language>
    </metadata>
    <files>
        <file src="**"/>
    </files>
</package>
Create NuGet Package manually
-
simply run this command from project root:
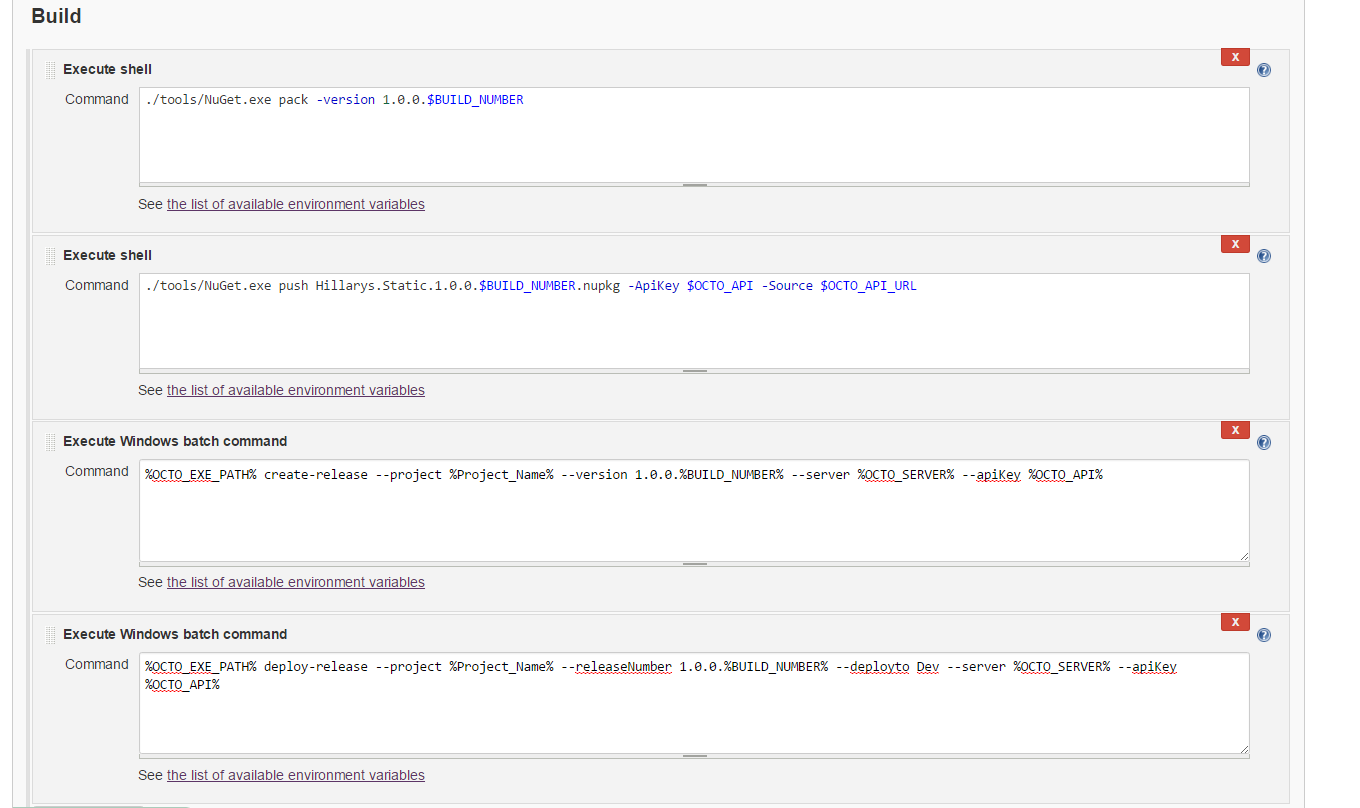
.\tools\NuGet.exe pack
Lets push this to our nuget feed
./tools/NuGet.exe myPackage.1.0.0.0.nupkg -ApiKey $OCTO_API -Source $OCTO_API_URL
Where:
- $OCTO_API is your Octopus Api key that you can create HERE
- $OCTO_API_URL is your octopus api endpoint, example: http://octopus.dev/nuget/packages
- $OCTO_SERVER is your Octopus server url, example: http://octopus.dev
- Build_Number is the build number generated by Jenkins (type it in manually when doing this manually) example: 1.0.0.0

Create a release
%OCTO_EXE_PATH% create-release --project %Project_Name% --version 1.0.0.%BUILD_NUMBER% --server %OCTO_SERVER% --apiKey %OCTO_API%
Deploy the release
%OCTO_EXE_PATH% deploy-release --project %Project_Name% --releaseNumber 1.0.0.%BUILD_NUMBER% --deployto Dev --server %OCTO_SERVER% --apiKey %OCTO_API%
Time to automate this using Jenkins
- create a new jenkins job
- create an octopus project with Deploy Nuget package
- make sure the NuGet Package ID matches the one in nuspec file
- setup the IIS properties if you want octopus to deploy it as IIS site
- attach the project git repository to jenkins job
- create build commands using the commands above like this:

- add parameters correctly on the jenkins project (tick
This project is parameterized)